
Learn how to uninstall problematic Windows updates in Windows 11 and Windows 10 using Settings, Control Panel, Command Prompt, Safe Mode, WinRE, and DISM. Nothing is more frustrating than installing a Windows update only to start running into issues like crashes, freezes, slower performance, boot failures, or even updates breaking graphics APIs and applications.
That’s one reason some users prefer to pause Windows updates altogether, but Microsoft can still automatically install certain updates from time to time.
The truth is that, despite Microsoft’s testing efforts, problematic updates still occur every now and then. While Windows always gets patches to fix the issues, you don’t always have to sit around waiting for an official solution.
If a recent Windows update is causing crashes, freezes, boot issues, or performance problems, you can uninstall the problematic update and restore your PC to a stable state.
That said, uninstalling Windows updates isn’t always as straightforward as it sounds. Depending on the type of update and the current state of your PC, some methods may work perfectly while others may throw errors or not be available at all.
That’s why I’ve looked for multiple ways to remove Windows updates. In this guide, I’ll walk you through the different methods to uninstall problematic Windows updates in Windows 11/10, including options for systems that won’t boot properly.
Before You Begin
Before uninstalling an update, note the KB number and create a System Restore Point if possible to back up your system’s current state.
Microsoft occasionally releases fixes shortly after problematic updates, so checking the official release notes can help you determine whether uninstalling the update is actually necessary.
If you’re still proceeding with the rollback, it’s a good idea to pause Windows updates first to prevent Windows from automatically reinstalling the update you just removed.
To pause updates:
- Open Settings.
- Go to Windows Update.
- Use the Pause Updates option.
Method1: Uninstall Updates Via Windows Settings
- Press Windows + I to open Settings.
- Select Windows Update.
- Click Update History.
- Scroll down and click Uninstall Updates.
- Select the recently installed update and click Uninstall.
- Restart your PC.
Method 2 : Remove Problematic Windows Updates Via Control Panel
- Press Windows + R.
- Type:
appwiz.cpl- Click View Installed Updates.
- Select the problematic update.
- Click Uninstall.
- Restart your PC.
Method 3: Uninstall Windows Updates Using WUSA in Command Prompt
If Settings or Control Panel won’t remove the update, use the Windows Update Standalone Installer (WUSA).
- Open Command Prompt as Administrator.
- Find the KB number:
Get-HotFix | Select-Object HotFixID, InstalledOn, Description | Sort-Object InstalledOn -DescendingRemove the update:
wusa /uninstall /kb:NumberReplace Number with the update KB number (without KB).
Restart your computer.
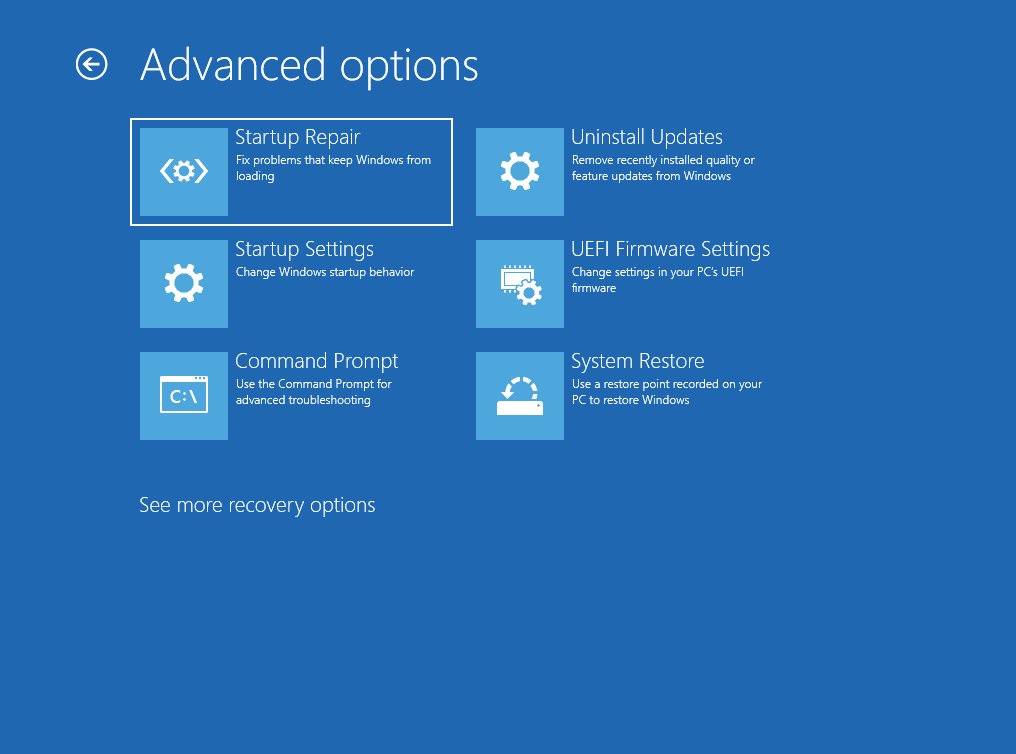
Method 4: Uninstall from Safe Mode or Windows Recovery Environment
- Force shutdown your PC three times during boot.
- Windows will open the Windows Recovery Environment (WinRE).
- Select Troubleshoot → Advanced Options.
- Click Uninstall Updates.
- Select either:
- Latest Quality Update
- Latest Feature Update
Follow the instructions and restart your PC.
Method 5: Uninstall Windows Updates Using DISM
If the update cannot be removed normally, use DISM.
Find the package:
dism /online /get-packages | findstr KBXXXXXXXRemove the package:
dism /online /remove-package /packagename:<PackageIdentity>Restart your computer after the removal is complete.
What to Do If Windows Won’t Let You Uninstall an Update
If Windows refuses to uninstall an update, Windows Sandbox may be preventing its removal.
Disable Windows Sandbox
- Search for Turn Windows features on or off.
- Uncheck Windows Sandbox.
- Click OK.
- Restart your PC.
- Try uninstalling the update again.
You can enable Windows Sandbox again afterward if needed.
Tips for Managing Windows Updates
Pause Windows Updates
Pause updates before uninstalling one to stop Windows from reinstalling it automatically.
Check Whether the Update Can Be Removed
Not every Windows update is uninstallable. Check Microsoft’s release notes first.
The Problem May Not Be the Update
Sometimes the issue is caused by:
- Driver conflicts
- Corrupted system files
- Incompatible applications
- Antivirus conflicts
- Hardware problems
Run SFC, update drivers, or test in Safe Mode before removing updates.
If the Update Doesn’t Appear
Windows may have replaced it with a newer cumulative update. Remove the newer update instead.
Combined Updates May Not Work with WUSA
Some Servicing Stack Updates (SSUs) are combined with Latest Cumulative Updates (LCUs). These often require DISM instead of WUSA for removal.
Final Thoughts
Uninstalling Windows updates should usually be your last resort, especially when dealing with security updates. Microsoft frequently releases follow-up patches that resolve issues found in previous updates.
However, if a recent update causes crashes, boot failures, or serious performance problems, the methods in this guide can help you safely roll back the update and restore your computer to a stable working state.